The ultimate LangChain series — Embeddings & vector stores
Learn how to upload the documents you loaded into a vector database. Activeloop edition.
Hey there! I'm Davide, a passionate developer advocate at Chainstack, the leading suite of blockchain infrastructure services.
I'm dedicated to empowering current and aspiring web3 developers by sharing valuable content and resources.
Within my articles, you'll discover a treasure trove of straightforward projects designed to bolster your understanding of fundamental Python, Solidity, JavaScript, and web3 skills. Whether you're a seasoned developer or just starting out, these projects offer an ideal learning path for honing your abilities in the exciting world of blockchain development.
Feel free to explore my articles, and let's embark on this remarkable journey of mastering web3 together!
Introduction
So far, we have gone over the initial steps of getting started and loading documents using LangChain. But if we want to use them in an application, we need to do a few more things. Now we've got to chat about embedding vectors and vector databases. It might sound a bit scary and complex but don't worry. As usual, LangChain comes to the rescue allowing us to get great results with a few lines of code.
We'll go over some theory as well, but feel free to skip directly to the coding part:
Vectors?
Why are we talking about vectors now? And how are they associated with databases?
To understand this, we first need to know that computers fundamentally deal with numbers. They don't understand words or sentences in the way humans do. So, in order to get computers to process language, we need a method to translate words, sentences, and documents into a numerical form that machines can understand. This is where vectors come into play.
In the context of language models, Vectors are lists of numbers that machines can interpret. Each word, sentence, or document can be represented as a unique vector in a multi-dimensional space. The beauty of this representation is that it can capture the meaning of a word or phrase based on its context. For instance, words used similarly or with similar meanings would be closer to each other in this multi-dimensional space, while unrelated words would be farther apart.
This property of vectors is extremely beneficial when we're training language models. It helps the models to understand the semantics or 'meaning' of the words, sentences, or documents they're processing. In a nutshell, vectors bridge human language and machine language, enabling computers to perform complex tasks such as translation, sentiment analysis, and even generating human-like text

Credit for the image to ODSC - Open Data Science
Regular and vector databases
Now that we understand what those vectors are, we need to see how databases come into play; well, we need a place to store those vectors.
Regular databases
Regular databases like SQL or NoSQL are built for structured or semi-structured text-based data. They perform operations like creating, reading, updating, and deleting data— commonly known as CRUD operations— and allow for complex queries. They're especially proficient at handling relationships between data points. Think of it as a library where you can fetch a specific book based on its title.
For example, you might use a regular database to store and manage customer data for an e-commerce website. Each customer could be a record in the database, with specific fields for the customer's ID, name, email, and so on. You could use complex queries to filter customers based on their purchase history, location, or other factors.
Vector databases
Vector databases are geared towards storing and managing high-dimensional vector data, generally used for machine learning and large language models. Unlike regular databases, they excel in similarity searches, also known as "nearest neighbors" searches. Imagine a library that, instead of giving you a specific book, gives you books similar in style or topic to a given book.
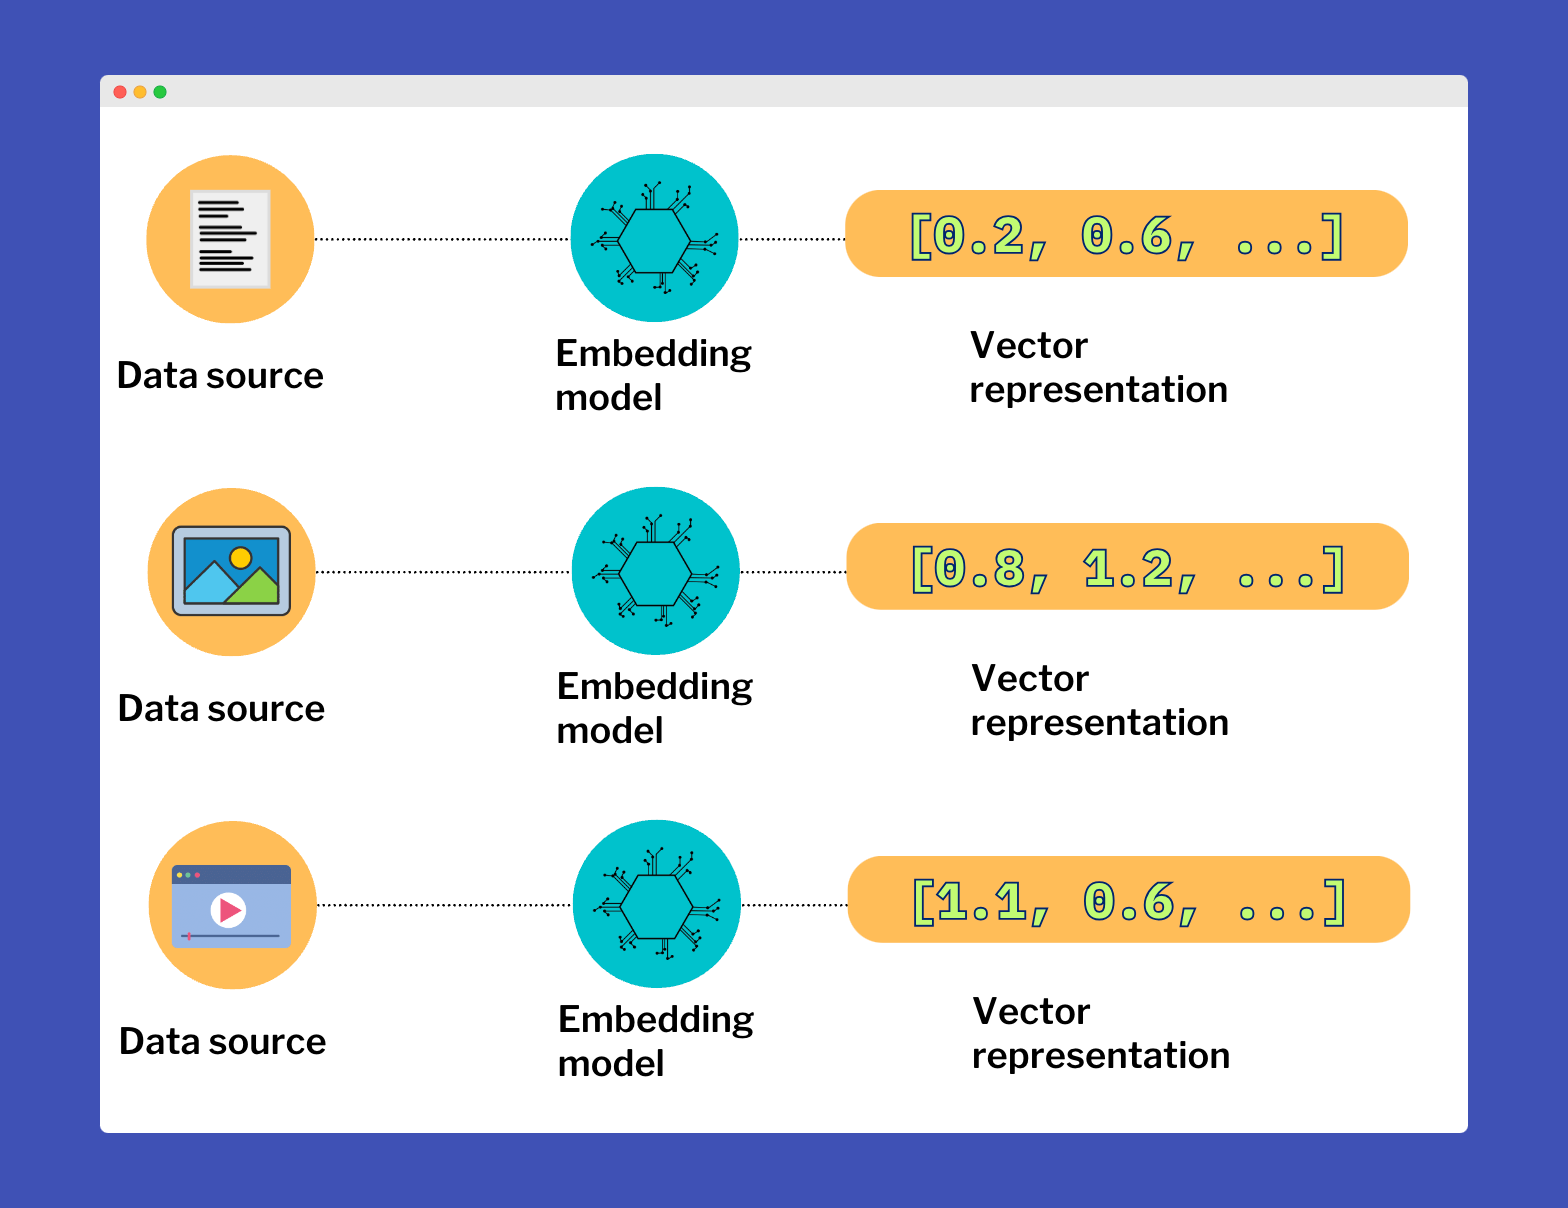
The process starts with the conversion of data - for example, text, images, or songs - into numerical vectors through techniques like embeddings. These vectors are then stored in the database. The database doesn't look for exact matches when a new query is made. Instead, it looks for similar results.
To accomplish this, the vector database measures the 'distance' between the vector representation of your query and the vectors stored in the database. This distance is often computed using mathematical methods such as cosine similarity or Euclidean distance. The vectors closest to the query vector—i.e., those with the smallest distance—are deemed the most similar and are retrieved.
An example of a vector database use case might be a recommendation system for a music streaming service. The songs could be represented as high-dimensional vectors, and when a user listens to a song, the service could use a vector database to find and recommend songs that are "closest" to the listened song in the vector space, i.e., songs with similar musical properties. This is very close to how apps that understand images work.
Vector embeddings
To store vectors in a database, we must first generate these vectors by transforming data into a vector form. This transformation process is often carried out using embedding models. The term 'embeddings' is commonly used to refer to these vectors, as they are the output of the embedding process. Therefore, when you hear 'embeddings' means vectors generated from a source through a specific model or method.
So this all seems very complex; how do I transform my data into numbers? There are various embedding models available but we'll focus on OpenAI text-embedding-ada-002 model here.
Learn more about embeddings on the OpenAI docs.
Here is a high-level overview of how embedding vectors work:
Selection of Dimensionality: The first step is to decide the dimensionality of the vector space. Each dimension in this space corresponds to a feature the embedding model will learn. The choice of dimensionality depends on the complexity of the task, but common choices range from a few hundred to a few thousand dimensions.
For example, the OpenAI embeddings we usually work with have a dimension of 1536.
Vector Initialization: Each word in the vocabulary is assigned a random vector in the chosen space. Over time these vectors are refined over time to capture the relationships between the words better.
Learning from Context: The vectors are adjusted based on the context in which each word appears. This is typically done using deep learning models. For example, a commonly used algorithm called Word2Vec trains a shallow neural network to predict a word given its surrounding words (or vice versa). During this process, the algorithm adjusts the vectors so that words appearing in similar contexts have similar vectors.
Refinement: The training process involves collecting large amounts of data and gradually adjusting the word vectors to predict the context better. Over time, this results in vectors that capture a lot of information about the words, including their semantics and syntactic.
After the embedding model is trained, it can transform words into vectors. For example, "dog" might be a vector like [0.1, -0.3, 0.8, ..., 0.2]. Similarly, other types of embeddings work by converting their respective data types into a numerical format. For example, image embeddings might take raw pixel data and convert it into a high-dimensional vector that captures the essential features of the image.
Luckily for us, LangChain and OpenAI do the heavy lifting as usual.
Store data in vector databases
We have a good idea of what happens behind the scenes, but this will not affect us much going forward, as LangChain does everything with very little code.
There are many vector database providers, but we'll focus on how to use the Python integration of LangChain with the Pinecone and Activeloop providers.
To use them, you'll have to create accounts and get API keys; they both offer a free tier, so let's take care of that:
Deep Lake account, complete with a Deep Lake API key.
OpenAI API key for the embedding model.
Now we can finally do some coding; we'll re-use some code from the previous articles, load a YouTube video, create chunks, generate embeddings, and store them in a vector database.
Note that in this article we'll only cover the use of Active Loop to keep the article more managable; check out the next one for Pinecone.
How to use Deep Lake with LangChain
Firstly, we'll dive into Deep Lake by Activeloop, pun intended. What's cool about this particular tool is its ability to create a local vector database. This feature typically enables faster data processing compared to cloud-based storage. We'll cover how to use Deep Lake for local usage and cloud-based operations.
Let's start by setting up some code to load and split a YouTube video; check out my previous articles if you are not familiar with these steps:
Data loaders in LangChain.
Text splitters in LangChain
You should already have the
deeplakelibrary installed if you followed the series from the beginning; otherwise check out the first article to set up your Python environment.
Use LangChain to load and split a video; this time, we'll have some more imports since we need to use environment variables and the DeepLake library:
import os
from langchain.document_loaders import YoutubeLoader
from langchain.text_splitter import TokenTextSplitter
from langchain.vectorstores import DeepLake # LangChain integration
import deeplake    # DeepLake library
from langchain.embeddings.openai import OpenAIEmbeddings
from dotenv import load_dotenv

load_dotenv() # take environment variables from .env.
As you can see, we have quite a few imports this time; you should already be familiar with YoutubeLoader and TokenTextSplitter as those are the data loader and the text splitters.
Interestingly, we're importing two different instances of 'DeepLake.' The capitalized DeepLake is an integration with LangChain aimed at simplifying the interaction with embeddings and vector databases. On the other hand, the lowercase deeplake is a library we'll use for managing the cloud database.
Note we import
dotenvand we'll set up environment variables later on.
Then let's set up the load and split; we'll work with this podcast video from the Chainstack developer experience team, where I'm one of the speakers😎:
# Load the video
video_url = "https://www.youtube.com/watch?v=nFFA0lFswSA"
loader = YoutubeLoader.from_youtube_url(video_url, add_video_info=True)
video = loader.load()

# Split text using the TokenTextSplitter
text_splitter = TokenTextSplitter(
    chunk_size = 250,
    chunk_overlap  = 20,
    add_start_index = True,
)

print('Splitting in chunks...')
split_video = text_splitter.split_documents(video)
print(f'Created {len(split_video)} chunks.')
Now that we've handled the loading and splitting let's dive into the juicy part. We'll be using the OpenAI embedding model and the DeepLake-LangChain integration to upload our data to the vector database. We'll kick things off with a local vector database, and as always, you'll see just how LangChain simplifies the process.
Let's start by setting up the environment variables, so in the root directory, create a file named .env , paste the following and add your Activeloop and OpenAI API key.
# OpenAI
OPENAI_API_KEY="YOUR_API_KEY"
EMBEDDINGS_MODEL="text-embedding-ada-002"

# Deeplake vector DB
ACTIVELOOP_TOKEN="YOUR_API_KEY"
DATASET_PATH="./podcast_vector_db" # "hub://USER_ID/custom_dataset"  # Edit with your user id if you want to use the cloud db.
Here we are setting up the API keys, the OpenAI model to generate vector embeddings, and the path to the local database, basically just put it wherever you want to create the database; in this case, it will be creating a directory named podcast_vector_db in the root directory.
# Init API keys
os.environ['OPENAI_API_KEY'] = os.getenv('OPENAI_API_KEY')
os.environ['ACTIVELOOP_TOKEN'] = os.getenv('ACTIVELOOP_TOKEN')

# Get embedding model from .env
EMBEDDING_MODEL = os.getenv('EMBEDDINGS_MODEL')

# Config embeddings model
embeddings = OpenAIEmbeddings(model=EMBEDDING_MODEL, disallowed_special=())

# Set the deeplake_path to the directory you want to local vector db in
deeplake_path = os.getenv('DATASET_PATH')
db = DeepLake(dataset_path=deeplake_path, embedding_function=embeddings, overwrite=True) # Load database
db.add_documents(split_video) # Upload vectors
print('Vector database updated.')
Now running the entire code, it will:
Load the video
Split it into chunks
Initialize OpenAI embeddings taking the model from
.envInitialize a local vector database
Upload vectors to the database
This code includes a bit more than the bare minimum; loading the embedding model name and the vector database's path is unnecessary, but I like to do it this way to keep the code modular and easy to maintain.
So at this point, we created a local vector database using Activeloop and LangChain, ready to be queried. DeepLake also gives us some information about the process, which is useful.
Splitting in chunks...
Created 60 chunks.
Creating vector DB...
./podcast_vector_db loaded successfully.
Evaluating ingest: 100%|█████████████████████████████████████████████████████████████████████████████████████████| 1/1 [00:08<00:00
Dataset(path='./podcast_vector_db', tensors=['embedding', 'ids', 'metadata', 'text'])

  tensor     htype     shape      dtype  compression
  -------   -------   -------    -------  -------
 embedding  generic  (60, 1536)  float32   None
    ids      text     (60, 1)      str     None
 metadata    json     (60, 1)      str     None
   text      text     (60, 1)      str     None
Vector database updated.
Use Deep Lake cloud vector database
In the previous section, we created a local vector db; let's see now how to upload to a cloud db. We need only to edit a few bits; make sure you have your Activeloop API key in the .env, and edit the dataset path for your cloud database.
Make sure to edit the
USER_IDwith yours.
DATASET_PATH="hub://USER_ID/podcast_dataset" # "hub://USER_ID/custom_dataset"
Then edit this part in the code:
# Set the deeplake_path to the custom dataset in the .env
ds = deeplake.empty(deeplake_path) # Create a new empty dataset first
db = DeepLake(dataset_path=deeplake_path, embedding_function=embeddings, overwrite=True, public=True)
db.add_documents(split_video)
print('Vector database updated.')
Here we only load a new empty dataset and then upload the vectors; after the process is complete, you can actually see the dataset in your Activeloop dashboard.
Splitting in chunks...
Created 60 chunks.
Your Deep Lake dataset has been successfully created!
The dataset is private so make sure you are logged in!
This dataset can be visualized in Jupyter Notebook by ds.visualize() or at https://app.activeloop.ai/USER/podcast_dataset
hub://USER/podcast_dataset loaded successfully.
Your Deep Lake dataset has been successfully created!
This dataset can be visualized in Jupyter Notebook by ds.visualize() or at https://app.activeloop.ai/USER/podcast_dataset
hub://USER/podcast_dataset loaded successfully.
Evaluating ingest: 100%|█████████████████████████████████████████████████████████████████████████████████████████| 1/1 [00:39<00:00
Dataset(path='hub://USER/podcast_dataset', tensors=['embedding', 'ids', 'metadata', 'text'])

  tensor     htype     shape      dtype  compression
  -------   -------   -------    -------  -------
 embedding  generic  (60, 1536)  float32   None
    ids      text     (60, 1)      str     None
 metadata    json     (60, 1)      str     None
   text      text     (60, 1)      str     None
Vector database updated.
Now you know how to upload your data to a vector database ready to be queried, which will be the next step.
Full code
Here you can find the entire code for your convenience; this is from the local database version:
import os
from langchain.document_loaders import YoutubeLoader
from langchain.text_splitter import TokenTextSplitter
from langchain.vectorstores import DeepLake
import deeplake
from langchain.embeddings.openai import OpenAIEmbeddings
from dotenv import load_dotenv

load_dotenv()

# Load the video
video_url = "https://www.youtube.com/watch?v=nFFA0lFswSA"
loader = YoutubeLoader.from_youtube_url(video_url, add_video_info=True)
video = loader.load()

# Split text using the TokenTextSplitter
text_splitter = TokenTextSplitter(
    chunk_size = 250,
    chunk_overlap  = 20,
    add_start_index = True,
)

print('Splitting in chunks...')
split_video = text_splitter.split_documents(video)
print(f'Created {len(split_video)} chunks.')

# Init API keys
os.environ['OPENAI_API_KEY'] = os.getenv('OPENAI_API_KEY')
os.environ['ACTIVELOOP_TOKEN'] = os.getenv('ACTIVELOOP_TOKEN')

# Get embedding model from .env
EMBEDDING_MODEL = os.getenv('EMBEDDINGS_MODEL')

# Config embeddings model
embeddings = OpenAIEmbeddings(model=EMBEDDING_MODEL, disallowed_special=())

# Set the deeplake_path to the directory you want to local vector db in
deeplake_path = os.getenv('DATASET_PATH')
db = DeepLake(dataset_path=deeplake_path, embedding_function=embeddings, overwrite=True) # Load database
db.add_documents(split_video) # Upload vectors
print('Vector database updated.')
Conclusion
Finally, the end! We've gone from theory to practice, exploring the captivating world of vector embeddings and vector databases. We've taken a deep dive into vector embeddings, discussing how they form the backbone of human and machine language communication. We also learned how to use the Activeloop integration with Langchain to upload to a vector database. In the next one, we'll see how to use Pinecone instead and then we can move to querying it and get responses from an LLM.